Viva Connections: a centralized hub for communication
Create a curated workplace experience that simplifies a digital workplace. Viva Connections is a centralized solution within the Microsoft 365 ecosystem.

Salesforce Developer Experience (SFDX) is a very promising Salesforce technology, including a new set of features and corresponding development tools. It has been available since the Summer of 2017 and it is constantly evolving. It simplifies integration with a version control system and helps build a better continuous integration (CI) and delivery (CD) process.
Before going any further . . .
Continuous Integration is the practice of merging all developer working copies to a shared mainline, several times a day. It is implemented with the help of a version control server and continuous integration build server. The most popular version control system is Git, and the popular repository servers used for this control system are GitHub, GitLab, Bitbucket, Assembla, etc. Other version control systems like SVN, TFS, or Mercurial are also used sometimes for continuous integration. Popular continuous integration servers are Jenkins and Travis. We also used GitLab as both the source control repository server and the continuous integration server.
Continuous Delivery is a development approach to ensure that the software can be released at any time. Usually when a new Git push command is executed that merges a new feature into a development branch, an automated build step is executed which runs unit tests and deploys code and customization to a test web server. Since the code is deployed to a test environment rapidly and test failures have to be fixed before the code can be deployed to that test environment, it is guaranteed that the software can be released from the current stable build of the development branch.
In traditional desktop software development continuous integration build step, a binary executable file or Java executable archive file is built and assembled from the source.
In web development continuous integration build step, source code is deployed to a destination server.
With Salesforce, source code and customization can be deployed to a dedicated sandbox related to the development branch. Before SFDX feature was introduced, Salesforce development approach had proposed two ways of code distribution and customization build, on the top of the Salesforce platform:
The Salesforce environment is needed for Apex tests execution. The preexisting Salesforce development approach supports only two types of organizations in running unit tests:
Also, it it possible to use free Developer Edition organizations, but these environments are simply specific cases of Production instances, which do not have Sandboxes, they have a limited amount of user licenses available, and have a limited amount of data and file storage. Additionally, some Salesforce features are also not available in Developer Edition environments.
If you decide to implement a source driven development, using a preexisting development approach, you will be forced to use Sandboxes for continuous integration and delivery build environments, and you will face several limitations.
When we tried to implement source driven development on one project using the development approach before SFDX, we faced the following obstacles:
Salesforce Developer Experience was released as beta in API Version 40.0 in the Summer’17 release. Because of certain SFDX limitations, like the inability to work with Person Accounts in SFDX, and no workaround for deployment of object with history tracking enabled, it is sometimes difficult to adopt it on the projects. Nevertheless my personal experience leads me to believe that SFDX is a breakthrough technology in Salesforce ecosystem.
Salesforce DX is built on these core principles:
What is SFDX? According to Zayne Turner in Getting Started with Salesforce DX (Part 1) article in Salesforce Developer Blog, SFDX is both new features and new tools provided by Salesforce to better adopt to source driven development. SFDX simplifies continuous integration and better suits to source driven development.
Salesforce DX provides a solution to the problems listed in the previous section.
As part of Salesforce Developer Experience, Salesforce offers a new type of organization to solve the first three problems related to Continuous Integration. This organization type is called Scratch Org. Scratch Org is a disposable temporary ephemeral org which has limited timespan and can be created by simple command from SFDX CLI tool and can also be deleted and disposed once it is no longer needed. By default it lives for 7 days but it’s lifespan can be increased up to 30 days.
SFDX source format differs from Metadata API format. In SFDX source format, custom object definition and zipped Static Resources are stored as folders with individual items inside, such source format helps to perform code review better and avoid many version control system conflicts.
Without SFDX, continuous integration build step, initiated from a push command to specific branch inside version control system, looks like the following:
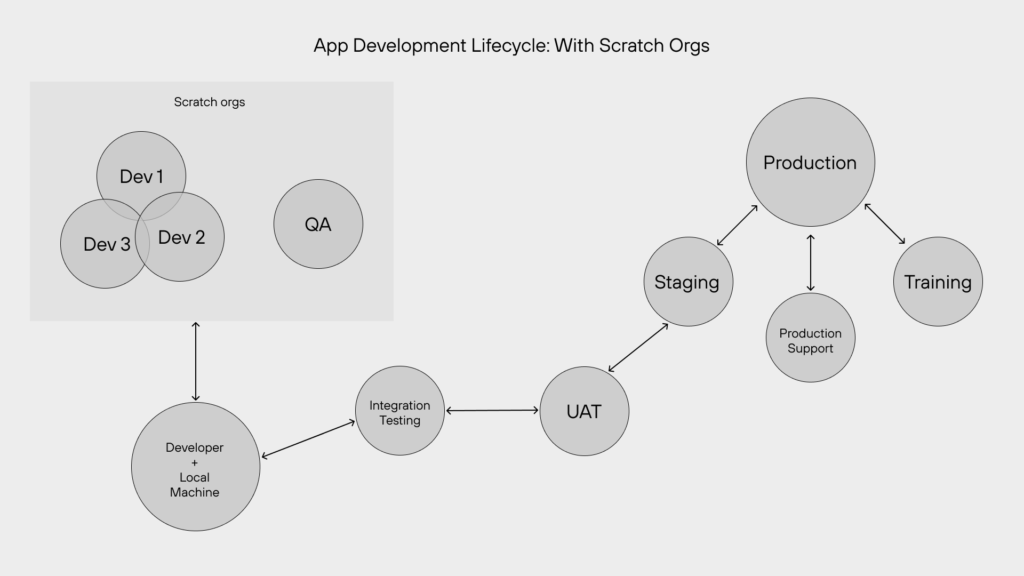
With SFDX, continuous integration build step, initiated from a push command to specific branch inside version control system, may look like the following:
Additionally, SFDX has commands not only to migrate metadata, but also to migrate data, so it is possible to set some data. SFDX CLI can be considered an alternative to Force ANT Migration Tool and Dataloader. However, it can’t process too much data.
If you want to refresh a fresh sandbox org from production, you could just use SFDX CLI to setup data automatically instead of asking a Data Migration specialist to load some data into your sandbox.
SFDX introduces new types of packages, which are called Unlocked packages. These packages are not coupled to developer edition and can be developed and recreated on many scratch orgs. They are upgradable but do not require unique namespace, actually they don’t require namespace at all. These packages allow to split enterprize organization code and metadata into modular upgradable artifacts.
To enable DX, click Enable Dev Hub checkbox in the Dev Hub menu item under Development in Setup.
To authenticate into a non-scratch org execute command:
> sfdx force:auth:web:login -a alias
This will open a new browser tab where you can login; OAuth credentials will be stored on local machine.
To create a folder with SFDX project execute command:
> sfdx force:project:create -n MyNewProject
This will create a MyNewProject subfolder in the current folder with SFDX project structure.
Common files and folders of SFDX project by default include:
sfdx-project.json – contains default project settings.config/project-scratch-def.json – controls shape of scratch org creation..forceignore – controls source files to omit for push, pull and status commands .force-app/main/default/ – contains source code and configuration metadata.Default content of project settings file sfdx-project.json contains items like path to project package directory, namespace, login URL and default API Version of source files generated by CLI tool.
{
  "packageDirectories": [  //source element folder
    {
      "path": "force-app",
      "default": true
    }
  ],
  "namespace": "", //possible configuration of namespace
  "sfdcLoginUrl": "https://login.salesforce.com",
  "sourceApiVersion": "43.0“ // default version of created classes, components etc.
}Default content of scratch org definition configuration file config/project-scratch-def.json contains items like Organization Name, Edition, and preferences and feature to enable and disable in the organization. To disable Lightning session cache in scratch org include “S1EncryptedStoragePref2” string literal in disabled preferences list.
{
    "orgName": "CoreValue Test Salesforce Scratch Org",
    "edition": "Developer",
    "orgPreferences" : {
        "enabled": ["S1DesktopEnabled"],
        "disabled": ["S1EncryptedStoragePref2"]
    }
}
To create a scratch org with given settings a command has to be executed:
> sfdx force:org:create -f config/project-scratch-def.json -a MyScratchOrg.
Find configuration setting by command:
> sfdx force:config:list
Set local setting by command:
> sfdx force:config:set
Set global setting by command:
> sfdx force:config:set -g
Global settings are stored in the “.sfdx” folder under your user account, while local settings are stored in the “.sfdx” folder in the project root folder.
Global settings apply to all projects, while local settings apply to the project where they are defined.
It is commonly suggested to add “.sfdx” folder to “.gitignore” file.
SFDX CLI has commands to create empty Apex Class, Trigger, Visualforce Page, Visualforce Component and Lightning Component Bundle, while all other components like Custom Objects, Fields, Tabs, Static Resources and many others should be created manually and then pulled from scratch organization.
There are several handy templates to create Apex Classes, like ApexException, ApexUnitTest and InboundEmailService which can be used as parameter switch to create an Apex Class with predefined template to implement custom exception, unit test class or service for inbound emails.
> sfdx force:apex:class:create -n DebugClass -d classes
> sfdx force:apex:class:create -n CustomException -d classes -t ApexException
> sfdx force:apex:class:create -n TestDebug -d classes -t ApexUnitTest
> sfdx force:apex:class:create -n EmailService -d classes -t InboundEmailService
There are no templates for other components but for Lightning Component Bundles there are five different commands to create a Lightning App, Lightning Component, Lightning Event, Lightning Interface and Lightning Test. There is no command to create a Lightning Tokens Bundle though.
> sfdx force:apex:trigger:create -n AT -s Account -e ‘before insert, after update’
> sfdx force:visualforce:page:create -n Page -l Label -d pages
> sfdx force:visualforce:component:create -n comp -l compLabel -d components
> sfdx force:lightning:app:create
> sfdx force:lightning:component:create
> sfdx force:lightning:event:create
> sfdx force:lightning:interface:create
> sfdx force:lightning:test:create
While working with SFDX pull and push commands, you don’t need to specify the nasty “destructiveChanges.xml” file if you want to delete some metadata component from organization, you can just delete the file and the corresponding metadata will be deleted from scratch org on execution of the push command.
Assume that there is a Custom Object deployed to the QA environment. You want to delete that object. So you have to both delete the field from version control system and specify that object inside of the “destructiveChanges.xml” file so that during the next automated build to QA that object will be deleted from QA. With SFDX push command, you can omit the second step for the scratch org.
If you are wondering how many active or total scratch orgs you may have in your Salesforce edition, then it is easy to find out. For Enterprise Edition you can have 40 total scratch orgs and you may create and dispose 80 scratch org daily while for Performance and Unlimited Editions you can have 100 total scratch orgs and 200 daily scratch org allocations. For temporary trial orgs, you can have only 20 total scratch orgs and 40 daily scratch org allocations.
If you are wondering how many active scratch orgs you currently have, you can just execute the command:
> sfdx force:limits:api:display
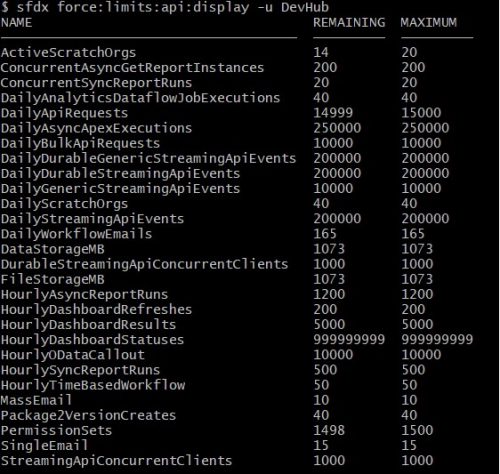
and subtract the remaining number from maximum. Also, you can use the command:
>sfdx help force:org:list
to list all orgs you’ve created or authenticated to.
SFDX has many helpful commands, for example if you forget the name of some command, you can find it in the full supported commands list which is shown by the command:
> sfdx force:doc:commands:list
Find a list of custom object on org:
> sfdx force:schema:sobject:list -c custom -u alias
Create a record:
> sfdx force:data:record:create -s Account -v “Name=Test” –u alias
You can also run Apex tests, retrieve metadata, deploy metadata, create users, assign permission set, etc.
CLI uses Tooling API and Metadata API under hood.
Three commands to work with sources, similar to git commands:
However, force:source:pull and force:source:push work only with scratch orgs.
Once you run the force:source:status command, it’ll detect which files have changed (from a Salesforce DX perspective) since your last pull or push. This is extremely helpful for detecting remotely changed files, especially when you have changed the same file locally. The pull and push commands provide a “–forceoverwrite” flag which you can then use to enforce (as the name says) an overwrite for a changed file.
How do I convert my existing source to DX?
First, you need to create a project:
> sfdx force:project:create -n super_awesome_dx_project
Place a folder with old source in project folder, then execute commands:
> sfdx force:mdapi:convert -r mdapipackage/
I have a DX project but I want to use ANT Migration Tool. How do I convert a DX project back to ANT migration Tool format?
Easy. Just execute commands:
> mkdir mdapioutput
> sfdx force:source:convert -d mdapioutput/
Can I deploy ANT project with DX?
Yes. Definitely, just run a command:
> sfdx force:mdapi:deploy -d mdapioutput/ -w 100
You might want to specify alias for target deployment organization with -u flag.
How do I perform ANT Retrieve task with DX?
To retrieve package you need to specify -p parameter switch with the package name:
> sfdx force:mdapi:retrieve -s -r ./mdapipackage -p DreamInvest -u org -w 10
To retrieve unpackaged source you need to specify -k parameter switch with the path to your package.xml file:
> sfdx force:mdapi:retrieve -k package.xml -r testRetrieve -u org
In both cases you need retrieve folder parameter and user alias to login into org. Use wait parameter to avoid running additional commands to determine retrieve status.
> sfdx force:lightning:lint force-app/main/default/aura —verbose —exit && /
> sfdx force:org:create -w 10 -s -f config/project-scratch-def.json -a ciorg && /
> sfdx force:source:push && /
> sfdx force:apex:test:run -c -r human -w 10
> sfdx force:org:delete -u ciorg -p
The above script runs lightning lint tool to verify code quality for lightning components, then a fresh new scratch org is created (like it is advised in ideal implementation of continuous integration: to create a new environment for test execution on every build step initiation). Then the source is pushed to that new scratch org and Apex Tests are executed after that. At the completion of every build step items, a scratch org is disposed so that environment for test execution is cleaned up.
After you’ve enabled Dev Hub capabilities in an org, you’ll need to create user records for any members of your team who you want to allow to use the Dev Hub functionality, if they aren’t already Salesforce users. Three types of licenses work for Salesforce DX users:
To give full access to the Dev Hub org, the permission set must contain these permissions.
To work with second-generation packages in the Dev Hub org, the permission set must also contain:
System Permissions > Create and Update Second-Generation Packages
SFDX is a very promising technology including the CLI toolset, the Scratch Org feature, and the Unlocked packages delivery option. SFDX CLI is a powerful and rich toolset to build and maintain enterprise application customization on the Salesforce platform.
Scratch Org feature gives flexibility to developers to create temporary organizations of different editions and shapes from the command line. New organization type concepts, in conjunction with command line interface, provide better continuous integration process implementation.
New Unlocked Packages type provide the ability of organization-agnostic development, which was not possible on the Salesforce platform before the introduction of unlocked packages. These packages provide more flexibility than existing manage package delivery or Metadata API delivery options since they don’t require unique not empty namespace for creation. Enterprise orgs now can split their code and customizations into modular upgradable artifacts without namespace using Unlocked packages.

Create a curated workplace experience that simplifies a digital workplace. Viva Connections is a centralized solution within the Microsoft 365 ecosystem.

Explore the basics of document management in Microsoft 365. Examine the possibilities of integration OneDrive for Business, SharePoint, and Teams.

Empower your employees with modern intranet solutions. Discover essential criteria for maximizing employee engagement, productivity, and collaboration.

In our Avenga team, we have many dedicated volunteers, and today, we want to tell you the story of Nazar Bigun, a Senior NodeJS Engineer, who was chosen by his teammates at Avenga Ukraine as the Volunteer of the Year.

Explore a guide on how to set up a cohesive cloud strategy. Learn more about the intricacies of cloud adoption.

Discover the latest news as KKCG completes the acquisition of Avenga from Oaktree and Cornerstone.

Explore the transformative role of Agile Business Analysts in project management. Discover their key responsibilities, essential skills, and impact on Agile success.

Avenga continually supports local communities, especially in their struggle for a democratic and independent world.
Start a conversation
We’d like to hear from you. Use the contact form below and we’ll get back to you shortly.